

You've found the wheel design you want, saved the reference photo, and probably already know whether you prefer a deep concave face or a sharper motorsport spoke. Then the order form asks for width, offset, hub bore, lug seat, brake clearance, and load rating. That's where a custom wheel stops being a styling purchase and becomes an engineering job.
The finish and spoke pattern matter, but they can't rescue a wheel that rubs under compression, contacts a caliper, vibrates at highway speed, or carries less load than the vehicle requires. This guide follows the sequence a careful wheel maker should use, from construction and fitment through finish selection, inspection, and delivery.
Table of Contents
- Why Custom Made Aluminum Wheels Are a Fitment Job, Not Just a Style Choice
- How a 6061 Forged Aluminum Wheel Is Built
- Monoblock vs Multi-Piece Forged Wheels
- Sizing, Offset, and Hub Fitment the Right Way
- Finish Options and What They Actually Cost You
- Brake Clearance and Load Rating Checks You Cannot Skip
- The Verification and Ordering Workflow
- A Short Buying Checklist Before You Commit
Why Custom Made Aluminum Wheels Are a Fitment Job, Not Just a Style Choice
A familiar scenario involves a B9 S4 owner choosing an aggressive 20x10.5 design from a catalog. The render looks perfect, but the order doesn't account for the actual hub bore, the brake package, the tire shoulder, or how far the inner lip moves toward the suspension. Once installed, the wheel can rub during compression and produce a vibration at highway speed. The problem isn't the spoke design. The problem is that the design was approved before the fitment was solved.
A proper order starts with the car, not the finish. The maker needs the exact chassis, body style, suspension configuration, brake package, tire size, and any planned changes. A wheel that clears a standard brake setup may not clear a larger rotor and caliper combination. A wheel that sits neatly on a stock ride height may poke beyond the fender after a suspension change, or touch the liner when the suspension compresses.
The failure points that deserve attention
The common mistakes are predictable:
- Offset errors: Positive offset moves the wheel inward, while negative offset moves it outward. A small change can affect both fender position and inner suspension clearance.
- Hub mismatch: A wheel can bolt on and still not be properly centered if its center bore doesn't match the vehicle hub or use an accurately sized centering ring.
- Lug seat mismatch: Cone, ball, and flat seats aren't interchangeable. The wheel and fastener must use the same seat design.
- Insufficient load rating: A light wheel isn't automatically suitable for a heavy sedan, especially when passengers, luggage, and hard impacts are part of normal use.
- Brake contact: The back of the spokes and the inner barrel both need clearance from the largest brake components fitted to the car.
- Sensor and hardware conflicts: A resale wheel may look compatible but fail to accommodate the correct tire pressure sensor, valve stem, or bolt head.
Practical rule: Don't approve a spoke face until the maker has approved the complete dimensional package.
The detailed ordering process described in this custom forged wheel fitment guide follows that logic. Width, offset, hub bore, lug seat, brake clearance, and load rating should be documented before anyone discusses whether the face should be brushed, painted, or machined.
A custom wheel can be visually perfect and mechanically wrong. The safest sequence is simple: identify the vehicle, verify the package, review the drawing, approve the construction, and only then finalize the finish.
How a 6061 Forged Aluminum Wheel Is Built
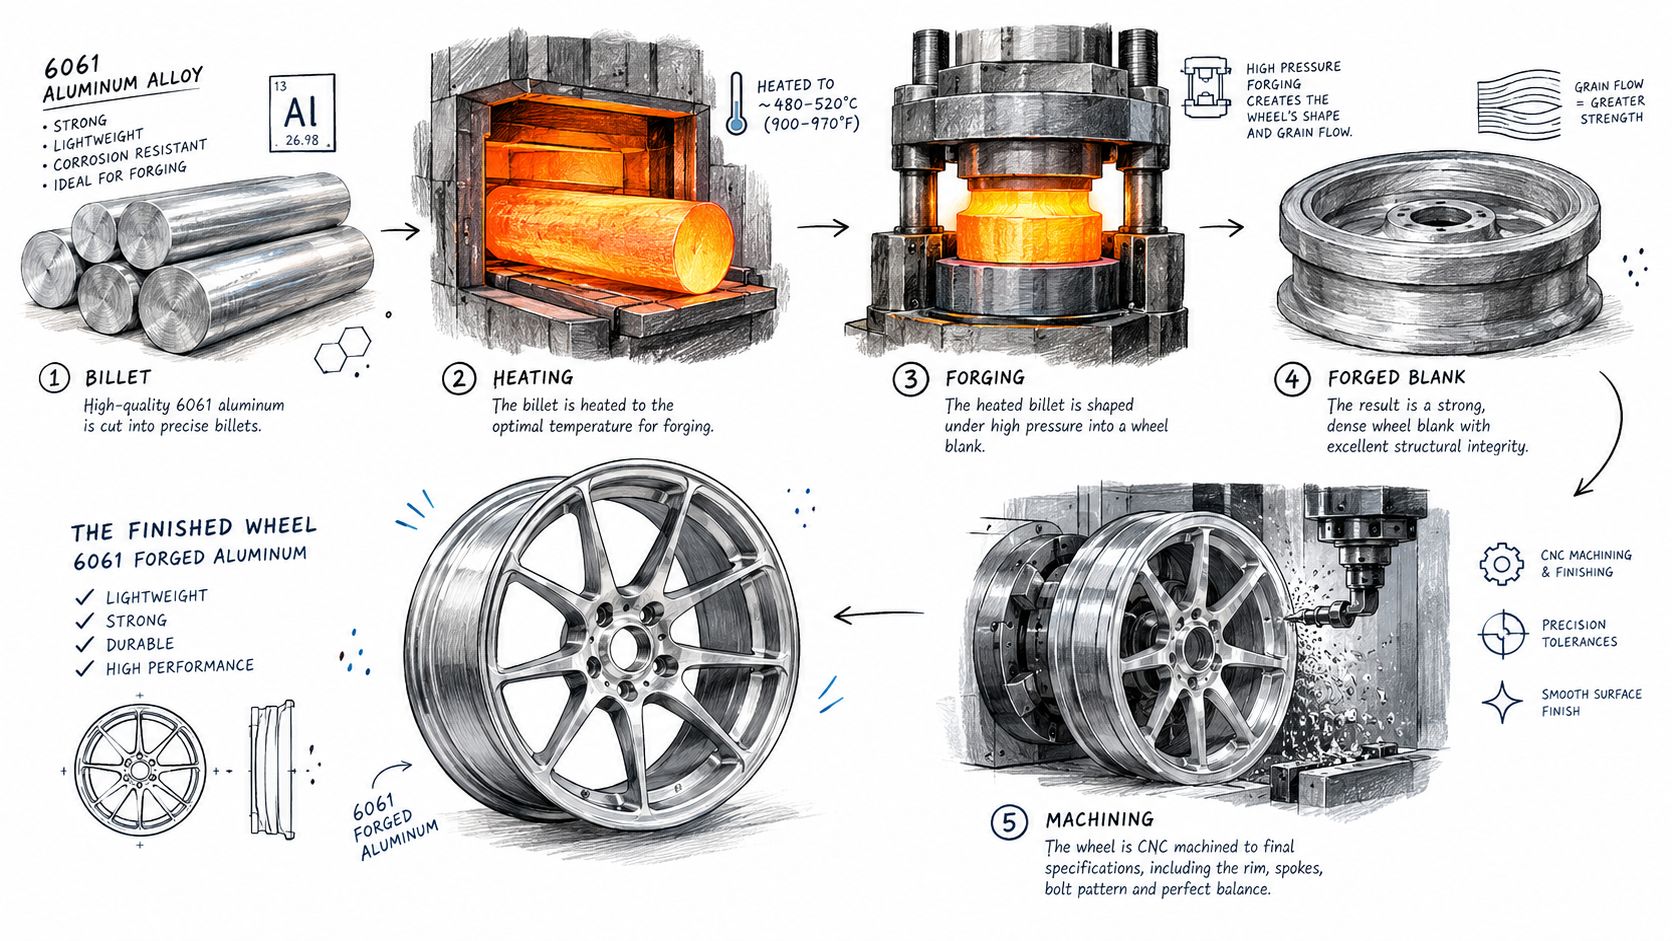
A forged wheel begins with a solid aluminum billet or bar, rather than a mold filled with liquid metal. That distinction is explained in this forged wheels versus cast wheels comparison. For modern custom work, 6061-T6 aluminum is commonly specified because its alloy and heat-treatment process provide a practical balance of strength, machinability, and durability.
The manufacturing method matters because the finished wheel has to carry load through its spokes, face, and barrel while meeting a precise dimensional drawing. A strong alloy cannot compensate for poor forming, incorrect machining, or weak inspection controls.
The history reaches back to 1948, when Alcoa introduced the first forged aluminum wheel. In 1968, 6061 alloy became the industry standard for forged aluminum wheels, and Alcoa introduced forged aluminum tubeless and wide-base wheels during the same development period. Those milestones established much of the production logic still used for performance wheels, as described in Alcoa's forged wheel history.
From billet to wheel blank
The billet is heated and pressed in a die until the material takes on a rough wheel shape. Pressure moves and aligns the grain structure through the part. The process is similar to kneading dough, where working the material distributes it through the intended form. It does not make poor design or poor processing harmless.
The resulting forged blank contains extra material around the face, spokes, and barrel. Rotary spinning or flow forming then develops the barrel. Controlled forming can reduce unnecessary barrel thickness while retaining the forged rim structure, provided the final dimensions are measured and verified.
Machining and heat treatment
Rough CNC machining removes material from the face, spoke windows, bolt holes, and inner profile. The manufacturer then applies T6 heat treatment and aging to establish the intended mechanical properties. Final CNC machining brings the wheel to its specified offset, hub bore, mounting face, spoke profile, and finish-ready surfaces.
That machining sequence is where a custom drawing becomes a usable wheel. The same model can require different cuts for another vehicle, brake package, or width. The order should therefore identify the exact dimensional target instead of relying on a generic wheel design.
Final controls should include dimensional inspection, runout checks, balance verification, and a review of the wheel's markings. A credible maker should identify the alloy specification, load rating, and inspection process. Descriptions such as “race quality” or “aircraft grade” do not replace those records.
Cost reductions usually appear in the controls around production. Inconsistent heat treatment, limited machining checks, poor surface preparation, or incomplete inspection can compromise an attractive forged blank. The difference between a well-controlled order and a risky one often appears in the drawing, test records, and quality-control documentation rather than in the catalog photograph.
The broader aluminum wheel market produced roughly 1.84 billion units in 2025, with Asia Pacific accounting for about 67% of output, as outlined in this aluminum wheel industry overview. That figure describes the wider aluminum wheel industry, not custom forged wheels specifically. For a buyer, the useful question is how the billet was formed, heat treated, machined, inspected, and documented.
A billet is only the starting material. The order becomes reliable when each production stage is tied to the approved specification and recorded before the wheels are finished.
Monoblock vs Multi-Piece Forged Wheels
Monoblock and multi-piece wheels can both be highly customized, but they solve different problems. Choosing between them should depend on the fitment range, intended use, repair expectations, and finish requirements rather than the visual impression of a catalog photograph.
A monoblock wheel is machined from one forged body. There are no outer and inner barrel joints, no assembly hardware between sections, and no separate lip to seal. That makes the design mechanically straightforward and well suited to a tight, fixed specification. It also limits how much the width and outer lip can be changed after production.
A multi-piece wheel uses separate sections assembled together. Depending on the design, the center, inner barrel, and outer barrel can be specified or replaced independently. This helps when a car needs a precise staggered fitment, a distinctive lip, or a future width change. The trade-off is additional hardware, assembly work, sealing surfaces, and weight.
The practical differences
| Attribute | Monoblock | Multi-Piece |
|---|---|---|
| Construction | One forged wheel body | Separate center and barrel sections |
| Weight | Usually simpler and lighter for a comparable specification | Additional hardware and sections can add weight |
| Width flexibility | Fixed after manufacture | Barrel changes can provide more flexibility |
| Finish layout | Face and wheel body share the main construction | Face, lip, and barrel can use contrasting finishes |
| Repair approach | Damage may require specialized wheel repair or replacement | Individual sections may be serviceable or replaceable |
| Sealing | No assembly seam between wheel sections | Seals and hardware require correct assembly |
| Best fit | Track-leaning street cars and tightly defined specifications | Staggered show builds, evolving fitments, and multiple seasonal setups |
Monoblock designs are often the cleaner engineering choice when the desired width and offset are already known. They suit a street car that sees spirited driving, occasional track use, and a consistent tire package. They also work well when the buyer wants a machined or anodized treatment across a continuous forged face.
Multi-piece construction earns its place when adjustment matters more than simplicity. A car with different front and rear requirements may benefit from separate barrel choices. A show-focused build may need a polished or colored lip with a contrasting center. If the owner later changes the ride height, brake package, or tire width, a serviceable multi-piece design can provide more options than a fixed monoblock.
The monoblock forged wheel guide is useful for understanding why a single-piece design is often selected for a specific, performance-oriented fitment. The important point is that neither construction is universally superior. A monoblock isn't automatically the right answer for a stance build, and a multi-piece wheel isn't automatically more durable because it has more adjustable parts.
For an Audi that will stay on one tire and brake package, I'd usually start by testing whether a monoblock can meet the complete specification. For a car with an aggressive staggered setup, show-oriented finish plan, or likely future changes, multi-piece construction may justify its added complexity.
Sizing, Offset, and Hub Fitment the Right Way
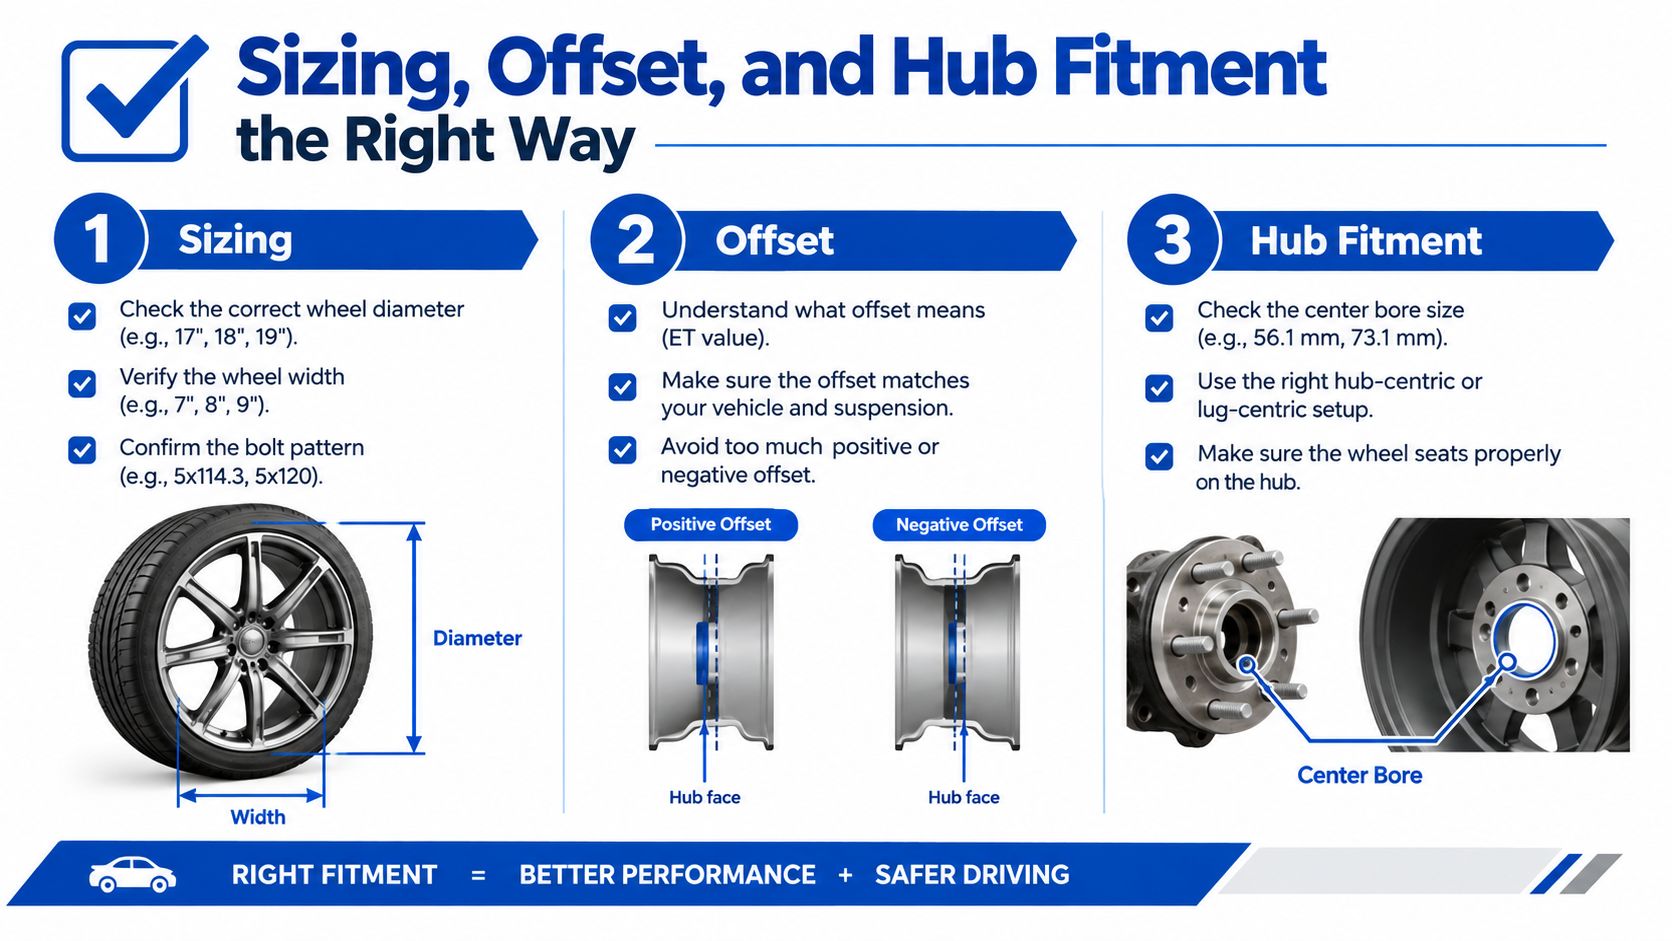
Wheel design should begin with dimensions in a fixed order. Start with diameter and width, then set offset, verify hub bore, confirm the lug seat, and finish with the load rating and brake template. Spoke shape comes after those decisions, because a spoke pattern that can't clear the vehicle's hardware isn't a usable design.
Diameter changes the tire sidewall and the amount of vertical space available inside the wheel. Width changes the tire's supported shape and the distance from the inner suspension components to the outer fender. A 19-inch wheel that is 8.5 inches wide isn't the same package as a 19-inch wheel that is 9.5 inches wide, even if both use the same diameter and general tire category.
Offset is a clearance measurement
Offset, commonly written as ET, is the distance from the wheel's mounting face to its centerline. Positive offset moves the wheel inward, while negative offset moves it outward. Backspacing measures from the mounting face to the inner rim edge, so it gives another way to understand where the barrel will sit.
The wheel offset measurement guide is helpful when comparing a replacement wheel with the original specification. Don't evaluate offset in isolation. The same change can improve outer fender clearance while reducing clearance to the strut, upright, or brake assembly.
Hub bore and lug seat
The hub bore, also called the center bore, locates the wheel around the vehicle hub. A wheel with a larger bore can sometimes be adapted with a properly sized hub-centric ring. A wheel with a smaller bore generally can't be installed without machining, and that work needs to be specified and controlled rather than improvised at installation.
Hub-centric mounting helps center the wheel, while lug-centric mounting relies more heavily on the fasteners and installation technique. Neither label removes the need for accurate machining. The bore, ring, mounting face, and fastener must work together.
The lug seat must also match the vehicle hardware. Cone seats, ball seats, and flat seats distribute clamping force differently. Reusing an original bolt merely because the thread fits can create a poor contact pattern or inadequate engagement.
Load rating closes the basic dimensional review. The rated capacity per wheel should exceed the vehicle's expected load at that corner, with sensible allowance for passengers, cargo, and real road impacts. Use the vehicle's axle rating and the wheel maker's documented rating, not a visual guess based on spoke thickness.
A fitment worksheet should therefore record:
- Diameter and width: Confirm the tire and body-style package.
- Offset and backspacing: Check inner suspension and outer fender clearance.
- Hub bore: Match the hub or specify an accurate centering ring.
- Lug seat: Match the wheel seat to the exact bolt or nut.
- Load rating: Verify the rating against the vehicle's axle requirements.
- Brake template: Confirm the inner barrel and spoke profile against the actual brake hardware.
Finish Options and What They Actually Cost You
A finish quote pays for more than color. It pays for surface preparation, masking, coating, curing, machining, sealing, and the level of maintenance the wheel will need after it meets brake dust, road salt, grit, and cleaning chemicals.
Brushed aluminum leaves directional tool marks visible across the surface. It gives a technical appearance and can highlight the shape of a forged face, but exposed or poorly sealed brushed surfaces can oxidize and stain with use. The finish needs careful cleaning, and the maker should explain what protective clear coat or seal is included.
Polished aluminum creates a brighter, more reflective surface, but bare polished aluminum has little protection from the environment. It can look excellent on a carefully maintained summer car and become a maintenance project on a daily driver exposed to winter contamination.
Compare the finish before you compare the color
Painted and powder-coated finishes place a polymer barrier between the aluminum and the road environment. That makes them practical choices for a car that will be driven regularly, although the quality of preparation and coating still controls the result. Powder coating isn't a substitute for impact protection. A deep curb strike can break the coating and expose the metal underneath.
Anodizing changes the surface rather than laying down a thick colored film. It can produce a distinctive appearance and a hard surface, but it has more limited color behavior than paint and isn't a complete corrosion-proofing solution on its own. Bare machined sections offer crisp contrast and visible tool work, but they need protection if the wheel will see harsh conditions.
| Finish | Durability | Corrosion Resistance | Price Impact |
|---|---|---|---|
| Brushed | Moderate with proper sealing, vulnerable if the surface is exposed | Depends heavily on clear protection | Moderate |
| Polished | Visually delicate and maintenance intensive | Low without a protective layer | Moderate to high |
| Painted | Good for regular road use when properly prepared | Good with complete coating coverage | Moderate |
| Powder coated | Strong barrier against routine road contamination | Good, but chips still need attention | Moderate to high |
| Anodized | Hard surface with a distinctive appearance | Useful protection, but not absolute | High |
| Bare machined | Sharp visual contrast, but exposed to staining and oxidation | Low unless sealed | Low to moderate |
The most useful finish question is not “Which one looks best in the render?” Ask how the wheel will look after repeated washing, brake dust, tire mounting, and winter storage. A show car that is cleaned by hand can support a more delicate finish. A daily-driven S4 that sits outside needs a coating system chosen for contamination and easy maintenance.
Finish also affects future repair. A simple painted face may be easier to blend after a small repair than a complex brushed, anodized, or multi-stage machined surface. If the buyer expects the car to see public roads, that repair question matters as much as the first-day appearance.
Brake Clearance and Load Rating Checks You Cannot Skip
Brake clearance and load rating are the two gates that should stop an order from moving forward if the answer isn't documented. A wheel can have the right diameter, width, offset, and bolt pattern and still fail one of these checks.
Brake clearance has two parts. The inner barrel must clear the outer diameter of the rotor and caliper assembly, while the back of the spokes must clear the caliper face and its most prominent points. A generic vehicle model or brake package label isn't always enough, especially after a big-brake conversion or a change from the original caliper.
Use the actual brake package
A good maker should request a brake template taken from the actual vehicle or provide a verified template that matches the exact hardware. The template needs to account for the caliper shape, not only the rotor diameter. A spoke that clears the rotor can still touch the caliper when the wheel is mounted.
A useful decision rule is straightforward:
Brake clearance rule: If the wheel maker can't show clearance against the largest brake package fitted or planned for the car, the design isn't ready for production.
That check matters for an Audi with a factory performance package, an aftermarket conversion, or a future upgrade. The buyer should disclose planned brakes before the spokes are finalized. Designing around today's hardware can create an expensive conflict when tomorrow's upgrade arrives.
Treat load rating as a hard specification
Load rating is the wheel's documented capacity per corner. It needs to be evaluated against the vehicle's axle requirements, with room for passengers, cargo, and the impact loads created by imperfect roads. Independent buying guidance recommends checking the vehicle's GAWR, the wheel's certified load rating, hub-bore tolerance, and brake fitment before tires are mounted, as explained in this forged wheel buying guide.
The rating should be marked on the wheel or supported by documentation that identifies the exact model and specification. “Forged” describes a manufacturing method. It doesn't tell you whether a particular width, spoke design, or application has the required capacity.
If you're fitting larger brakes to an Audi, compare the wheel drawing with the actual hardware before placing the deposit. The Anker big-brake kit for Audi B8 and B8.5 illustrates why the brake package has to be treated as part of the wheel specification rather than an afterthought.
The Verification and Ordering Workflow
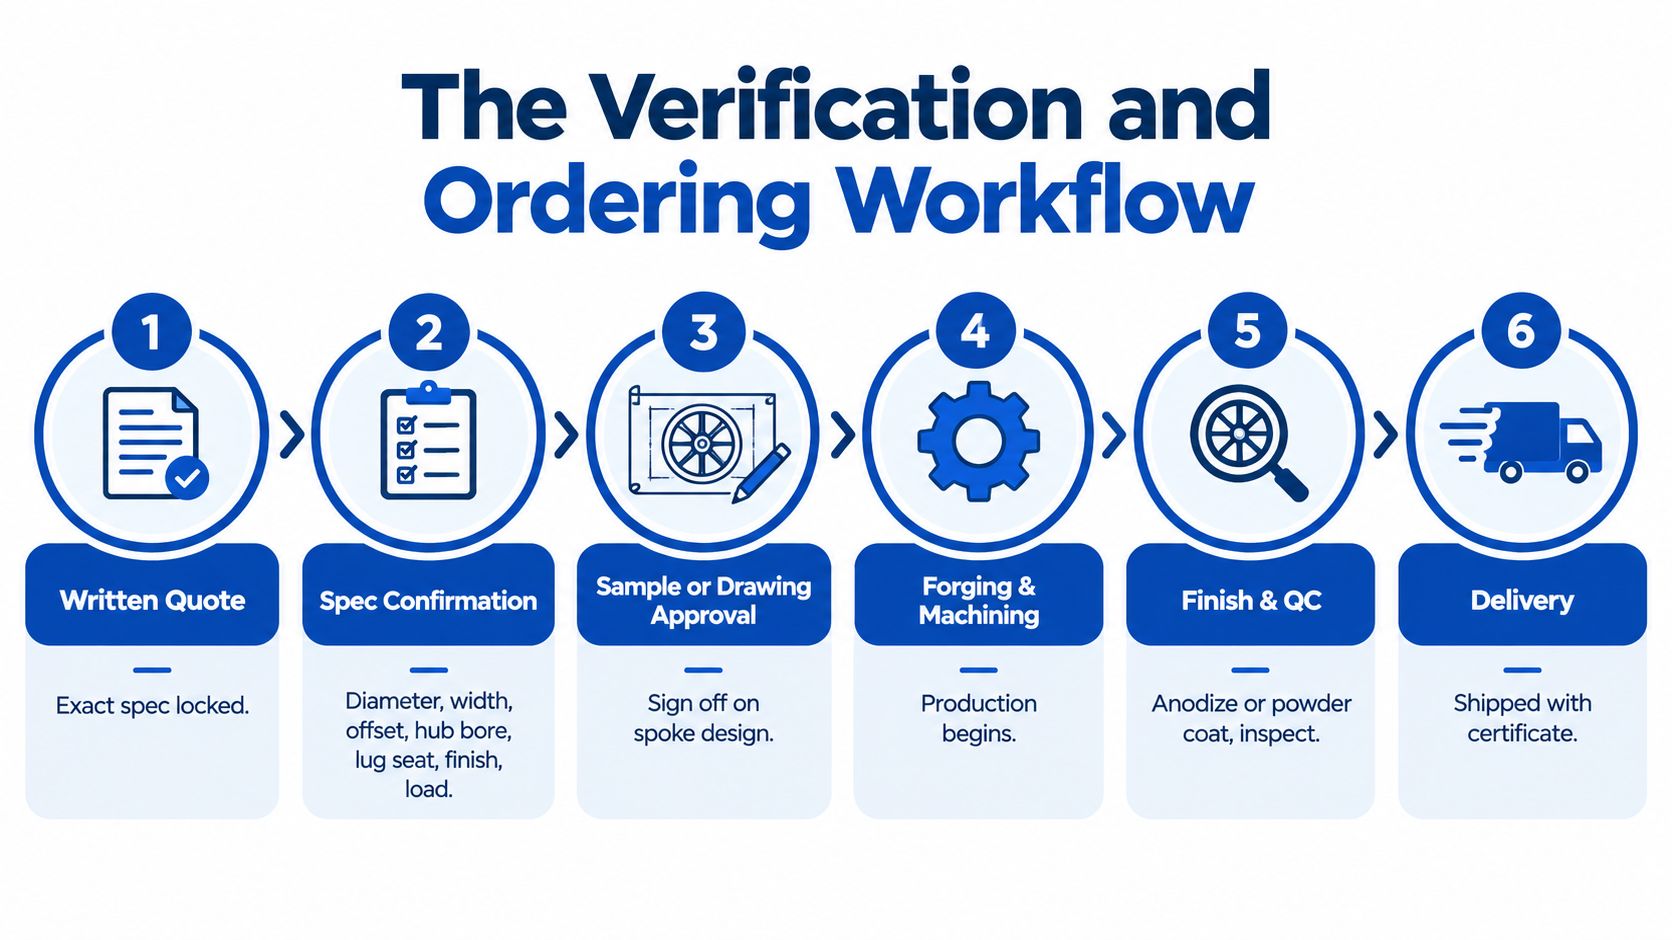
A custom wheel order shouldn't be one conversation followed by a payment link. It should produce a written trail from the first specification through final inspection. That record protects both sides when a design has unusual width, offset, spoke geometry, hardware, or finish requirements.
Start with a complete written quote
The quote should list the exact diameter, width, offset, hub bore, lug seat, construction, finish, and load rating per corner. It should distinguish per-wheel pricing from the price for the complete set and identify included hardware, center caps, valves, and rings.
Don't accept “Audi fitment” as the complete specification. Different chassis, brakes, suspension packages, and tire choices can require different dimensions. The quote should describe the actual vehicle and the intended use.
The next review is the CAD drawing or vehicle mockup. A generic image only proves that the design exists. It doesn't prove that the spokes clear the caliper, the barrel clears the suspension, or the outer lip sits where you expect under compression.
Approve the design before production
For a non-standard design, request a drawing that shows the wheel from the face, side, and brake-clearance perspectives. A physical sample or prototype can be valuable when the spoke curvature, concavity, or stepped lip is difficult to judge from a flat render. CAD can communicate dimensions accurately while still making the final forged shape look different in person.
The quote should also state the production schedule, deposit terms, and cancellation conditions. Custom work commits material, machining time, finishing capacity, and sometimes dedicated tooling. Those commercial details belong in writing before money changes hands.
Inspect the delivered wheels
Before mounting tires, inspect each wheel under good light. Check the casting or forging marks, finish consistency, hub bore, bolt holes, valve area, and visible damage. Weighing each wheel can identify a major mismatch, while a PCD gauge can confirm the bolt pattern rather than relying on a visual comparison.
Check runout with suitable measuring equipment if there is any doubt. It is much easier to address a dimensional problem before tires are mounted and balanced. The same applies to the finish. Photograph any damage immediately and compare the delivered wheel against the approved specification.
The paperwork should include the material information, load-rating documentation, and finish warranty where applicable. Keep the final drawing and written approval with the vehicle records. If a future owner, tire shop, or brake installer needs to understand the package, the order file provides more reliable information than memory.
A Short Buying Checklist Before You Commit
Treat each line below as a release gate. If the maker won't confirm it in writing, the order isn't ready.
- Vehicle and use: Record the exact chassis, body style, brake package, suspension, tire plan, and whether the car is a daily driver, track car, or show build.
- Diameter and width: Confirm that the tire package and wheel dimensions suit the vehicle's body and suspension.
- Offset and backspacing: Check both the outer fender position and the inner clearance under steering and compression.
- Hub bore: Match the vehicle hub or specify a correctly sized hub-centric ring. Don't rely on the lug bolts to correct a poor center fit.
- Lug seat: Confirm whether the wheel requires cone, ball, or flat-seat hardware, then verify thread and engagement separately.
- Load rating: Compare the wheel's documented capacity per corner with the vehicle's axle requirements and realistic payload.
- Brake clearance: Approve a drawing or template against the actual caliper and rotor package, including planned upgrades.
- Construction: Choose monoblock or multi-piece based on repairability, width flexibility, weight, and finish requirements.
- Finish: Specify the coating or surface treatment, including a sample, reference, or documented color and protection system.
- Commercial terms: Put the specification, price, deposit, production schedule, cancellation terms, and warranty into the quote.
- Delivery inspection: Check hub bore, PCD, runout, finish, markings, and weight before tires are installed.
- Documentation: Keep the material information, load-rating certificate, final drawing, and finish warranty with the car.
The point of this checklist isn't to make a simple purchase feel complicated. It prevents the expensive version of simple, where the tire is mounted before someone discovers that the wheel doesn't clear the caliper or center correctly.
For Audi owners, Vorsprung Autowerk offers custom forged wheel options with vehicle-specific specifications, including construction, dimensions, spoke design, and finish. Send the exact vehicle, brake package, tire plan, and preferred design, then ask for a written fitment review before committing to the order.


